

Introduction
Most people encounter laser cleaning on metal first — rust dissolving from steel, paint lifting cleanly from a car panel, grime blasted from stone. The results are striking, and the obvious next question is whether wood responds the same way.
It does work on wood, but the substrate is different enough to warrant its own guide — one that covers how the mechanism operates on an organic material, which coatings respond well and which present genuine challenges, how parameters shape the outcome, and how laser cleaning compares to chemical and abrasive alternatives.
The goal here is an honest picture: the technology has real strengths on wood and real limitations, and you will find both covered plainly so you can judge whether it fits your application.
TL;DR
A laser cleaner can deliver exceptional results on wood — but the substrate's sensitivity to heat means parameter control is everything. Get it right and you preserve fine surface detail that no abrasive method could touch. Get it wrong and the damage is permanent.
The difference between those two outcomes is what this guide explains.
This article covers:

How laser ablation works on wood surfaces
Pulsed vs continuous wave modes for wood
How different coatings respond to laser energy
Key parameters governing cleaning outcomes
Laser cleaning vs chemical and abrasive methods
Realistic results: what works and what doesn't
How a Laser Cleaner Works on Wood
If you've seen laser cleaning demonstrated on steel or stone, the process looks almost violent — a beam blasting rust or grime away at speed, with the metal underneath completely unfazed. Wood is a different story entirely, and applying that same mental model to an organic substrate is the first mistake to avoid.
What Laser Ablation Actually Does
At its core, laser ablation is straightforward: a focused laser beam delivers concentrated energy to a surface, the target material absorbs that energy and vaporises or physically detaches, and the underlying substrate is left intact.
This is the central promise of laser cleaning — the beam stops at the base material, because every material has a specific ablation threshold, the minimum energy density required to remove it. When the laser is tuned to exceed the contaminant's threshold without reaching the substrate's, the contaminant goes and the substrate stays.
Why Wood Behaves Differently from Metal
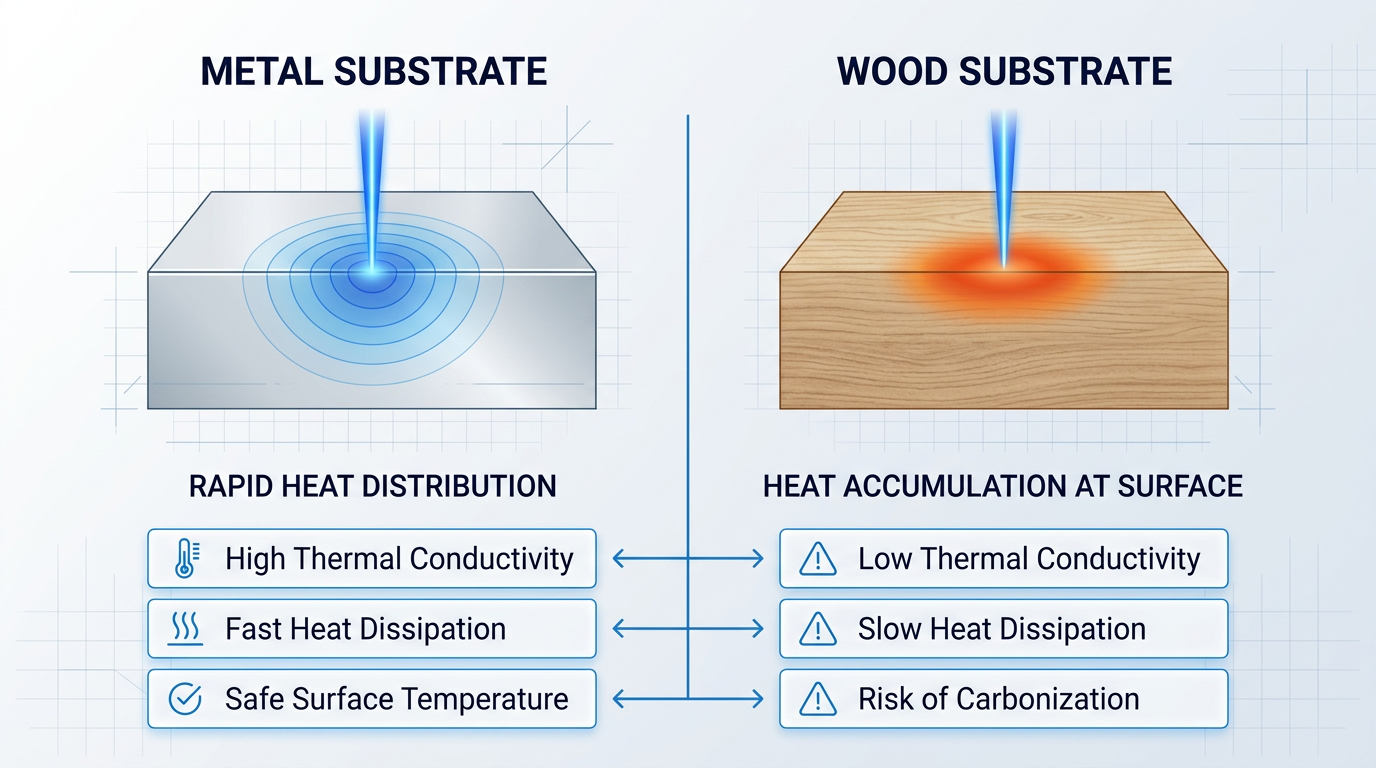
Metal handles laser energy well for one fundamental reason: it conducts heat rapidly. When a laser pulse strikes steel, the thermal energy distributes quickly through the substrate's mass, keeping surface temperatures in check.
Wood is the opposite. It is an organic, thermally sensitive material with low thermal conductivity and a structurally variable microstructure — grain direction, species density, and resin content all affect how it responds to heat. Because wood cannot conduct heat away from the surface quickly, thermal energy accumulates exactly where the laser is working.
The consequence is not abstract: the risk of permanent surface damage on wood is real, close, and arrives with far less warning than on metal. A parameter setting that would be perfectly safe on a steel plate can char a timber surface in a single pass.
Differential Absorption: The Mechanism of Selectivity
What makes laser cleaning viable on wood at all is a property called differential absorption: contaminants such as paint, soot, aged varnish, and grime absorb laser energy far more readily than the cellulose and lignin that make up the wood substrate beneath them.
Dark contaminants in particular — paint layers, char residue, mould pigments — absorb infrared laser energy efficiently, while the fibrous wood structure reflects and scatters a significant portion of it. This spectral and thermal selectivity is what allows the laser to act on the coating rather than the wood, when parameters are correctly set.
Laser cleaning works on wood because contaminants absorb laser energy preferentially over the wood substrate — but this selectivity only holds within a specific parameter window. Exceed that window and the laser begins acting on the wood itself.
Why Short Pulses Limit Heat Damage
The physics of pulsed laser delivery are central to why this technology can work on thermally sensitive organic materials. A short pulse deposits energy faster than it can conduct into the wood beneath — the contaminant absorbs the energy and vaporises before significant heat has time to diffuse into the substrate.
Between pulses, the wood surface has an opportunity to cool before the next burst of energy arrives. This pulse structure is not simply a power-delivery choice; it is a heat-management mechanism, and it is why pulsed lasers are the appropriate tool for wood applications. The deeper question of how pulsed and continuous wave modes compare in practice is addressed in the next section.
Carbonisation: The Primary Failure Mode
When energy density is too high, or when heat accumulates between pulses faster than the wood surface can dissipate it, surface temperatures exceed the point at which cellulose begins to carbonise — converting irreversibly to char.
Carbonisation is not a mysterious accident. It is a predictable consequence of specific parameter errors, and it is avoidable. Understanding it as a mechanical outcome of excess energy input — rather than an unpredictable hazard — is the correct frame for working with a laser cleaner on wood.
Key Laser Parameters: A Vocabulary Reference
Six parameters govern how a laser cleaner for wood behaves at the surface. Each is defined briefly here; how to set and adjust them is covered in the parameters section of this guide.
- Fluence (power density): The amount of laser energy delivered per unit area (J/cm²); the primary variable controlling whether ablation occurs and at what depth.
- Pulse repetition frequency: The number of pulses emitted per second (measured in kHz); determines how much time the surface has to cool between pulses.
- Scan speed: The rate at which the laser head moves across the surface (mm/s); faster speeds reduce the energy deposited at any single point.
- Spot size: The diameter of the focused laser beam at the surface; a smaller spot concentrates energy more intensely over a narrower area.
- Working distance: The distance between the laser head and the surface; deviating from the specified focal length defocuses the beam and alters its intensity.
- Number of passes: How many times the beam traverses the same area; multiple light passes are generally safer on wood than a single aggressive one.
These parameters interact with one another — raising scan speed reduces effective fluence, while increasing pulse repetition frequency raises the rate of heat input. Understanding each term individually is the prerequisite for understanding why they must be balanced together.
The mode in which the laser delivers its energy — pulsed bursts versus a continuous wave — is the first and most consequential equipment decision for any wood application, and it shapes how all of these parameters behave in practice.
Pulsed vs Continuous Wave Lasers for Wood
When evaluating a laser cleaner for wood, most buyers focus on wattage — but the single most consequential equipment decision is one that rarely appears on the spec sheet first: whether the machine operates in pulsed mode or continuous wave mode.
Continuous wave (CW) mode means the laser emits a constant, uninterrupted beam for as long as the trigger is held — a delivery pattern well-suited to heavy industrial metal cleaning, where substrates have high thermal mass and dissipate absorbed heat rapidly without damage.
Wood cannot do the same. Because thermal conductivity in wood is low, heat from a sustained CW beam accumulates in the substrate faster than it can escape — and at any practical working power level for cleaning, that accumulation crosses the carbonisation threshold, scorching fibres irreversibly.
This is not a problem that lower power settings resolve: it is a structural mismatch between the delivery mode and the substrate's thermal properties, and reducing CW output does not change that fundamental incompatibility.
How Pulsed Delivery Protects the Wood Surface
Pulsed mode delivers energy in discrete bursts, each separated by an interval of zero output — the laser fires, then rests, then fires again, cycling at a set pulse repetition rate.
Each pulse vaporises a thin layer of contaminant through ablation; the gap between pulses allows the wood surface to cool before the next energy deposit arrives, keeping the heat-affected zone shallow and preventing thermal energy from building to destructive levels.
A CW laser dialled down to match the average power of a pulsed system still delivers energy continuously — there are no cooling intervals. The cumulative thermal load on the substrate is structurally different, and on wood, that difference determines whether the surface survives.
The protective mechanism in pulsed operation is not simply that average power is lower — it is that peak power is concentrated within each discrete pulse while the cumulative thermal load between pulses is interrupted, giving the substrate the recovery time CW delivery categorically denies it.
For wood applications, this means only pulsed laser systems are appropriate: operators evaluating equipment should treat mode capability as a primary selection criterion, confirmed before wattage, brand, or price are considered.
Equally important alongside pulsed delivery is tunable power — the ability to adjust output continuously across the full range rather than in coarse steps or fixed presets, since wood cleaning tasks span from light surface grime to thick, tenacious coatings on the same substrate.
Woodrow Scientific's ELASER, for instance, is a pulsed fibre laser with power tunable from 0–100% and an adjustable pulse repetition rate up to 200 kHz — the combination of pulsed delivery and full-range tunability that wood cleaning demands in a single system.
With the delivery mode understood, the next question is what actually happens when that pulsed energy reaches the surface — and the answer varies considerably depending on what coating or contaminant is present.
How different coatings respond to laser energy on wood
The differential absorption principle established earlier explains a practical reality operators encounter every day: not all coatings behave the same under laser energy. Knowing your coating type before you begin is the single most important step toward a predictable result — and it determines whether a laser cleaner for wood delivers a clean surface or a frustrating one.
Coatings that respond well to laser ablation
Oil-based paint is among the most predictable and well-behaved removal targets on wood. The paint absorbs laser energy effectively, responding to pulsed ablation by cracking, lifting, or vaporising layer by layer — a controlled, progressive process that gives the operator clear visual feedback at each pass.
Varnish and lacquer also respond well, and the selectivity this enables is particularly valuable in heritage and furniture restoration. Aged varnish — shellac, oil varnish, traditional lacquers — can be removed without disturbing intact original finish beneath it, a level of precision that chemical stripping simply cannot replicate.
Soot and smoke residue represent perhaps the easiest category of all: surface-deposited carbon absorbs laser energy very effectively, and the contaminant lifts cleanly with minimal risk to the substrate beneath. This makes laser cleaning a strong choice for fire-remediation work and the conservation of smoke-damaged heritage timber.
Surface stains and glazes — thin, surface-applied coatings that sit on top of the wood grain — respond reasonably well to laser ablation. The important caveat, addressed directly below, is that not all stains fall into this category.
Coatings and contaminants that present challenges
The most common question about laser stain removal on wood is also the one that most deserves a precise answer. Deep-penetrating dye stains that have been absorbed into the wood grain are a genuine limitation of the technology. As one practical source puts it: the laser removes the surface layer of stain, but stain that has soaked deep into the wood fibres may remain — because the laser acts on the surface, and there is no distinct layer for it to lift once the dye has become part of the fibre structure itself.
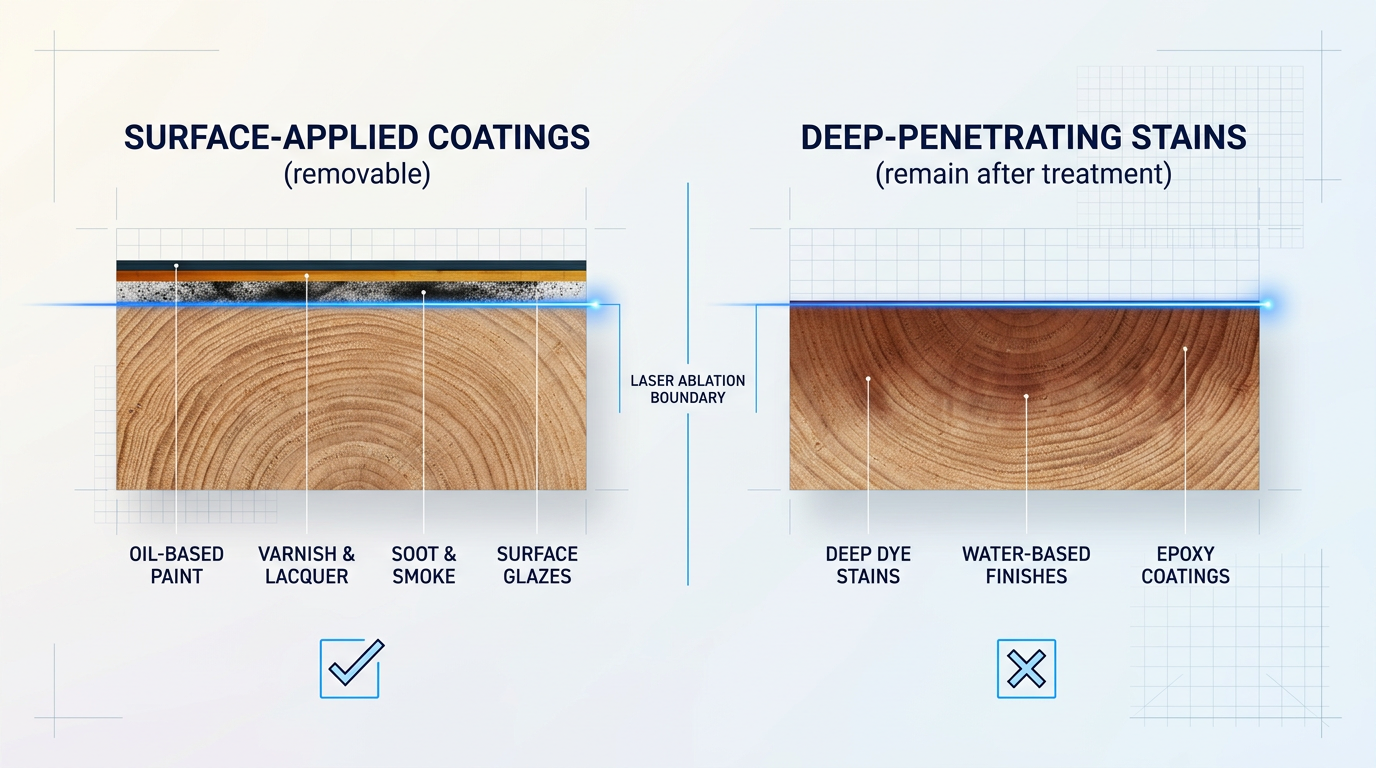
Water-based finishes present a known practical challenge. These coatings absorb laser energy poorly at the near-infrared wavelengths used by fibre lasers, making removal inefficient or very slow compared to solvent-based finishes — a point confirmed by multiple wood-specific sources. Identifying the finish type before beginning work is therefore essential.
A reliable field diagnostic is the solvent reactivity test: dampen a cloth or cotton swab with denatured alcohol and wipe a hidden area of the surface. If the finish softens, smears, or transfers colour onto the cloth, the finish is shellac or a related solvent-soluble coating. If neither alcohol nor lacquer thinner produces a reaction, you are most likely dealing with a water-based or cured polyurethane finish — and laser removal will be significantly slower.
Epoxy coatings are a demanding application on any substrate, and on wood the challenge is compounded by the substrate's thermal sensitivity. Thick epoxy layers require careful management of scan pattern and beam overlap rate to avoid localised heat accumulation — research on epoxy removal confirms that scan path geometry and overlap rate have a significant influence on cleaning uniformity and effectiveness. This is not an impossible application, but it requires disciplined parameter control that narrows the operating window considerably.
Biological contamination: mould and growth
Mould, mildew, and biological growth vaporise effectively under laser ablation. The heat generated during the ablation process also destroys fungal cells and spore coatings at the surface, which reduces recolonisation risk — an advantage that chemical cleaning methods do not offer in the same way, since chemical treatments kill surface growth without sterilising the substrate itself.
This makes laser cleaning particularly relevant for heritage timber, damp buildings, and external joinery where biological contamination is a recurring problem and chemical residue from conventional treatments is undesirable.
Across every coating category, one physical boundary defines what a laser cleaner for wood can and cannot accomplish: the laser removes what is present on the surface of the wood. Penetrating oils, impregnating agents, and deep dye stains that have been absorbed into the substrate remain there after treatment and may affect subsequent finishing.
A laser cleaner removes coatings and contaminants from the wood surface; it cannot extract substances that have chemically penetrated the wood fibre. This is a physical boundary, not a limitation of any particular machine or parameter setting. Operators who understand this distinction before beginning work avoid the most common source of unmet expectations.
With a clear picture of how each coating type behaves, the natural next question is what governs whether a given pass produces a clean result or risks damaging the wood beneath — and that is precisely where laser parameters come in.
Laser Parameters That Govern Cleaning Outcomes on Wood
Understanding the ablation mechanism and how different coatings respond to laser energy gets you halfway to a successful result. The other half is knowing which parameters to set, which direction to move them, and — critically — how adjusting one changes the effect of all the others.
The six parameters that govern wood cleaning outcomes
Each parameter below controls a distinct aspect of how energy reaches the wood surface. The goal in every case is the same: find the minimum effective energy input that removes the contaminant while leaving the substrate intact.
- Power density (fluence): Energy delivered per unit area — the primary ablation lever. Too high and wood chars; too low and the contaminant survives. Wood's ablation threshold is notably lower than metals.
- Pulse repetition frequency (PRF): Controls the interval between pulses and therefore the cooling time available between energy deposits. Lower frequency means longer cooling intervals and lower thermal load on the substrate.
- Scan speed: How fast the beam traverses the surface. Faster speed limits dwell time per point and reduces heat input; slower speed raises effective energy density and scorching risk.
- Spot size: Larger spot distributes energy over a wider area, reducing peak intensity. Smaller spot concentrates it. Spot size and power must always be balanced together.
- Working distance: The lens-to-surface distance must match the field lens specification. A defocused beam loses cleaning effectiveness; an over-focused beam concentrates energy dangerously.
- Number of passes: Multiple light passes at conservative settings are always safer than one aggressive pass — the professional standard for wood and heritage work.
Of these, pulse repetition frequency is arguably the most consequential single parameter for wood. It is the one variable that directly governs how much time the surface has to dissipate heat between successive energy deposits — and operators often underestimate its importance because a lower PRF can feel counterintuitively like "less power" when in practice it is the primary safeguard against heat accumulation.
On wood, lowering pulse repetition frequency is often the most effective way to prevent charring — it extends the inter-pulse interval, giving the substrate time to cool before the next energy deposit arrives. Getting PRF wrong is the fastest route to irreversible char.
Practical sources confirm that for most hardwood paint-stripping applications, a PRF in the range of 10–80 Hz is appropriate, with lower-density and resinous species requiring the lower end of that range — and that frequencies above 100–200 Hz on hardwood produce heat accumulation that chars the surface before cleaning is complete.
Scan speed works in close concert with PRF. For dense hardwoods, minimum scan speeds of 400–600 mm/s at moderate power prevent charring in single-pass operation; for lower-density species and softwoods, 600–1,000 mm/s or above are typically required. The relationship is direct: a slower arm sweep on a complex profile or at a corner inherently increases dwell time, which is why experienced operators reduce power — not speed — in those areas.
Working distance is an operational discipline rather than a dial setting. Maintaining the correct lens-to-surface distance throughout a cleaning pass is one of the most practically demanding aspects of handheld laser work on wood, particularly on curved or relief surfaces where standoff varies continuously.
On number of passes: the multi-pass approach is not a workaround for underpowered equipment — it is the correct professional method for any organic substrate. Each light pass removes a thin layer and gives the operator a chance to inspect before committing to the next, which is the only way to work safely within wood's narrow operating window.
Parameters are a system, not independent dials
The most important concept in this section is that no single parameter controls outcome in isolation. Research into laser process parameters confirms that surface roughness and cleaning quality are primarily functions of energy density and overlap ratio — and both of those are themselves determined by the combined effect of power, pulse frequency, scan speed, and spot size.
Studies have shown that two samples processed at very different individual power and frequency settings produced near-identical surface roughness because their effective energy densities were equivalent — demonstrating that it is the emergent combination, not any single dial, that determines the result.
This interdependence has a direct practical consequence: increasing power without adjusting scan speed and PRF raises effective fluence beyond what the change in wattage alone would suggest. On wood — where the margin between effective cleaning and irreversible charring is narrow — that compounding effect is exactly what causes damage.
Machines with fully tunable, programmable parameters are not a luxury for wood applications — they are a requirement. Fixed-parameter or coarse-control systems cannot safely navigate the narrow operating windows wood demands. Systems that offer 0–100% power tunability, an adjustable pulse repetition rate, and fully programmable scan shapes via a touchscreen GUI — such as the ELASER — give operators the resolution they need to work within those windows rather than around them.
When these parameters are misjudged — even slightly — the consequences on wood are immediate and often irreversible, which is why scorching deserves its own dedicated treatment in the next section.
See the ELASER Specifications for Wood Cleaning
You now understand the parameters that govern laser cleaning on wood. See how those parameters translate into real machine capability — power, pulse control, and scan settings built for precision surface work.
Wood scorching: why it happens and how to prevent it
Of all the outcomes possible when using a laser cleaner for wood, scorching is the only one that cannot be undone — which is precisely why it deserves its own treatment.
Scorching is not a random failure mode. It is a mechanistically predictable consequence of energy input exceeding the wood's thermal tolerance: surface temperatures climb above the char threshold, and cellulose begins to carbonise.
The parameter errors that trigger this are specific and identifiable: power density set too high, pulse frequency too fast (leaving insufficient cooling time between pulses), scan speed too slow (excessive dwell time per point), or repeated passes over the same area without allowing the substrate to return to ambient temperature.
On the surface, scorching manifests as darkening, blackening, and loss of grain texture. In more severe cases, surface brittleness develops and structural fibre damage extends beneath the visible layer.
The carbonised layer cannot be removed by further laser passes. Applying more laser energy to a scorched surface does not clean it — it deepens the damage. Once the char threshold is crossed, the only remediation is mechanical abrasion, which removes wood along with the char.
Not all wood is equally vulnerable. Certain substrate conditions and surface types carry a meaningfully higher baseline risk, and operators working across different species and surface orientations need to recognise them.
- Low-density species: Species like poplar and alder have lower thermal mass and a lower char threshold, leaving a very narrow safe operating window.
- End-grain surfaces: Heat conducts along wood's grain tubes significantly faster than across them, causing end-grain to absorb and channel energy inward more rapidly than face grain.
- Resinous species: Resin pockets in species like teak concentrate energy locally, causing over-charring in spots even when the average surface temperature appears safe.
- Thin veneers: Minimal substrate depth means there is almost no thermal mass to absorb excess heat — any parameter error is immediately destructive.
- High power or frequency, slow speed: Running high power or high pulse frequency without a compensating increase in scan speed is the most common route to unintended scorching.
The common thread across these scenarios is either reduced thermal mass or localised energy concentration — both of which shrink the margin between effective cleaning and irreversible damage.
This is also why a single "safe" parameter set cannot be transferred across all wood species. Denser hardwoods — oak, maple, ash — carry more thermal mass and can tolerate slightly higher energy densities. Resinous hardwoods like teak present a distinct, localised risk even when bulk surface temperature is nominally within range, because their resin pockets absorb energy unevenly. Species identification and parameter adjustment are part of professional practice, not optional refinements.
Managing scorching risk: the incremental approach
The professional standard for managing scorching risk is incremental escalation: begin conservatively, inspect at every stage, and increase parameters only when the current pass has confirmed the substrate is responding safely.
- Start at minimum effective power: Begin at the lowest power setting that can plausibly achieve ablation — typically 10–15% for delicate or unknown substrates.
- Use fast scan speed: A faster scan speed minimises dwell time per point, reducing the heat deposited at any single location on the surface.
- Keep pulse frequency low: A lower pulse frequency gives the wood surface adequate time to cool between pulses, preventing cumulative heat build-up.
- Make multiple light passes: Each pass removes a thin layer and provides a natural inspection point. Multiple light passes are always safer than a single heavy pass.
- Inspect after every pass: Check for any darkening, texture change, or surface brittleness before escalating parameters. Stop and reassess if any sign of scorching appears.
Before working on any visible surface, always conduct test cleaning on a hidden area or a scrap piece of the same species at the same moisture content.
Critically, inspect the test area after 24 hours — not immediately. Some colour changes, including subtle scorching, develop after the surface cools rather than being visible the moment the laser passes over it. The 24-hour inspection interval is a practical professional standard, not excessive caution.
With the primary risk understood and a clear management framework in place, the next logical question is how laser cleaning compares to the chemical and abrasive alternatives it most commonly replaces — and that is exactly where the guide turns next.
Laser cleaning vs chemical stripping for wood
Chemical stripping is a reasonable choice on many surfaces — but wood is the substrate where its structural limitations show up most clearly, and understanding why changes how you evaluate the alternatives.
A chemical stripper works by applying solvents to the surface, which penetrate and soften the coating film until it can be scraped or washed away. On thick or heavily layered coatings, this is genuinely effective.
The problem on wood is that solvents do not stop at the coating. They penetrate open grain, wet the timber, and raise wood fibres — and depending on the product and the species, this can cause swelling and discolouration that persists long after the stripper has been removed.
Practitioners in woodworking forums consistently note that even after the stripper is cleared away, residue can remain in recesses and carved details, interfering with subsequent coatings if not fully neutralised first. This is a structural limitation of the method on wood, not a user error — the solvent cannot be selective about where it goes once it contacts an open-grained surface.
Laser cleaning sidesteps this entirely. The process is completely dry: no moisture enters the grain, no solvent penetrates the wood, no fibre raising occurs, and there is no neutralisation step before refinishing.
Because laser ablation acts on the coating rather than the wood beneath it, the substrate arrives at the refinishing stage in materially better condition — with fewer preparatory steps required and less risk of the surface needing corrective work before a new finish can be applied.
- Substrate impact: Chemical stripping wets and raises wood grain; laser cleaning is dry and leaves the timber surface undisturbed.
- Waste and disposal: Solvent sludge from chemical stripping is classified as hazardous waste under UK regulations, requiring consignment notes and authorised disposal. Laser cleaning produces only filtered particulate.
- Post-clean readiness: Laser-cleaned wood is ready for inspection immediately. Chemical-stripped wood must dry and be neutralised before refinishing can begin.
- Genuine chemical advantage: Very intricate items that fit fully inside a dip tank benefit from immersion, which reaches every recess simultaneously — a scenario where laser access can be slow.
The pattern across these axes is consistent: laser cleaning's advantages follow directly from the nature of the method, while chemical stripping's genuine advantage is specific and bounded to one scenario — the fully immersed intricate item.
Speed is where chemical stripping is most often underestimated. The active stripping phase — applying the product and waiting — is only part of the job cycle. Dwell time alone can run from minutes to several hours depending on coating thickness, and it is followed by scraping, rinsing, neutralising, and waiting for the timber to dry before any finishing work can begin.
Laser cleaning has no dwell time and no wash-off stage. The job cycle ends when the beam has completed its passes — and the surface is ready to assess immediately.
On intricate carved pieces, it is worth acknowledging the dip-tank scenario honestly: where every recess, undercut, and fine detail is reached simultaneously by immersion, chemical stripping can achieve coverage that would take a laser operator considerably longer to match pass by pass. For that specific application, the throughput case for chemical stripping is real.
Keeping solvents off wood is not primarily an environmental preference — it is a surface quality decision. A dry strip leaves the grain structure, dimensional stability, and finish-receptivity of the timber intact in a way that a solvent soak cannot.
On total cost of ownership, the economics of chemical stripping accumulate in ways that are easy to overlook: ongoing spend on solvents and neutralising agents, PPE replacement, ventilation requirements, and the administrative overhead of complying with COSHH regulations and UK hazardous waste duty-of-care obligations — including consignment notes for every disposal movement.
Laser cleaning eliminates consumable spend and the disposal overhead entirely, and reduces rework by delivering the substrate to the refinishing stage in better condition. Over a run of jobs, that combination is where the economics favour laser cleaning — and it is the right frame for comparing the two methods.
Chemical stripping is not the only alternative worth weighing, however. Abrasive methods — sanding and blasting — present a different set of trade-offs, particularly around what they do to the wood surface itself, which the next section addresses directly.
Laser cleaning vs abrasive methods for wood
Sanding and media blasting are the default tools for large-area wood surface preparation — fast, familiar, and unquestionably effective at removing material. The problem is that removing material is precisely what you cannot afford when the wood beneath the coating is the thing you are trying to protect.
Both methods work through physical impact or friction, and neither has any mechanism for distinguishing between the contaminant layer and the substrate beneath it. The abrasive acts on whatever surface it contacts. Substrate loss is therefore not a risk of poor technique — it is inherent to how these methods function at a fundamental level.
Sanding removes wood fibres along with the contamination on every pass. Original surface profile is permanently altered, sharp edges on carved mouldings are rounded off, fine grain texture is abraded away, and any patina built up over decades is gone. On veneer, the margin for error is essentially zero — the substrate is thin enough that even cautious sanding can cut through entirely.
Media blasting raises the grain and, particularly on open-grained species, drives abrasive particles into the wood surface in ways that are difficult to fully remove. On heritage pieces, architectural joinery, or carved furniture where surface integrity is the whole point of the work, that kind of damage is not recoverable.
Why laser cleaning preserves what abrasives cannot
As established earlier in this guide, the laser beam acts on the coating or contaminant through differential energy absorption — the contamination absorbs the laser energy and vaporises, while the cellulose and lignin of the wood beneath reflect and scatter most of it. When parameters are correctly set, the original surface profile, grain texture, decorative carved detail, and patina are left intact. The substrate is not touched because the physics of the process does not require touching it.
This selectivity becomes especially consequential on complex geometry. Sanding rounds off crisp edges and loses control on irregular profiles. Blasting cannot be directed precisely enough to clean recesses without damaging surrounding detail. A laser beam follows carved geometry exactly as directed by the operator, cleaning into recesses and along edges that abrasive methods would either damage or simply miss.
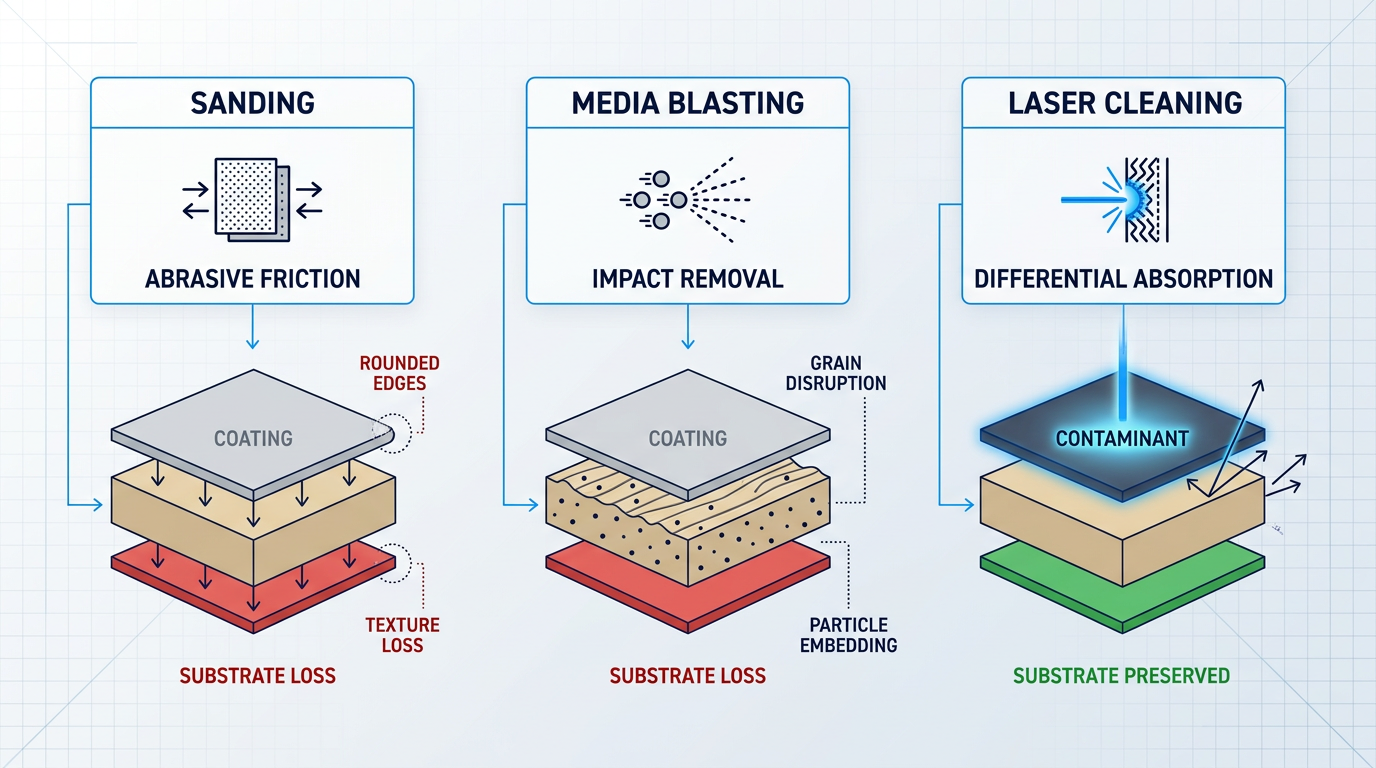
The working environment differences between the three methods are also practically significant for anyone running a restoration or joinery operation.
- Sanding: Generates large volumes of airborne wood dust — a recognised fire hazard and health concern requiring dust extraction and appropriate PPE.
- Media blasting: Leaves abrasive residue scattered across the working environment and potentially embedded in the wood surface, adding significant cleanup time and cost.
- Laser cleaning: Produces fine particulate and fume only at the work point, managed by a HEPA-rated extraction system. No abrasive residue is embedded in the surface.
For the operator, this difference in debris profile translates directly into overhead: sanding demands continuous extraction infrastructure and PPE management; blasting requires containment, cleanup, and residue removal from both the work and the environment; laser cleaning concentrates the waste stream at a single capture point, keeping the working area substantially cleaner.
Abrasive methods remove material indiscriminately — the contaminant and the wood beneath it are equally vulnerable. Laser cleaning removes the contaminant and leaves the wood. For any application where the original surface must be preserved, that distinction is the whole decision.
That said, abrasive methods retain a genuine and honest place in the toolkit. On large, flat, rough exterior surfaces — decks, structural framing, log cabin exteriors — where speed matters more than fibre preservation and the wood carries no heritage or decorative value, a belt sander or pressure-blast rig is often the more practical choice.
The additional precision of laser cleaning may not justify the time investment on utility timber that will be exposed to the elements regardless. Recognising that scope honestly is not a concession about laser cleaning's capabilities — it is simply an accurate description of where each method belongs.
With the method comparisons now complete — chemical stripping in the previous section, abrasive methods here — the question shifts from which approach is right to what laser cleaning actually delivers when you put it to work on wood in practice.
What to Realistically Expect from Laser Cleaning on Wood
The comparisons are done. You now know how laser cleaning stacks up against chemical stripping and abrasive methods. The more useful question is: what does it actually produce? The honest answer is that a laser cleaner for wood works — reliably, and with a quality of outcome that no other method can match on the right applications — but it operates within a well-defined envelope, and understanding that envelope is what separates good results from wasted time.
When parameters are correctly calibrated, the cleaned surface is genuinely remarkable. Grain texture is preserved, aged patina is retained at the operator's discretion, and carved or relief detail remains legible and intact. This is not a stripped surface — it is a cleaned one, with the original wood essentially untouched beneath whatever coating or contaminant has been removed.
The contaminants and coatings that respond most predictably are those that sit on or near the surface of the wood, absorb near-infrared laser energy efficiently, and respond cleanly to pulsed ablation.
- Varnish and lacquer: Old varnish and lacquer respond very well, including selective layer-by-layer removal on multi-layered finishes where preserving an underlying original coat matters.
- Paint (including multi-layer): Latex and oil-based paints are removed effectively. Multiple coats can be addressed in controlled passes, with the operator choosing how deep to clean.
- Soot and smoke residue: Carbon deposits and smoke residue from fire damage are among the most straightforward applications — high NIR absorption, clean ablation, minimal risk to substrate.
- Surface grime and organic deposits: Accumulated dirt, wax buildup, oil stains, and adhesive residue respond well when the contamination sits on the surface rather than having penetrated the wood fibre.
- Biological contamination: Mould and surface biological growth are removed effectively. The ablation process also sterilises the treated area, killing spores without chemicals or water.
What these contaminants share is that they are surface-applied — they occupy the wood's outer layer rather than its interior structure, which means the laser's selectivity can work as intended: energy absorbed by the contaminant, substrate left behind.
The limits of the technology follow the same logic in reverse. Where a substance has moved beyond the surface and into the wood itself, the laser cannot reach it without removing the wood too.
- Penetrating dye stains: Deeply absorbed pigments that have bonded with wood fibre cannot be fully reversed. The laser removes surface-level stain but cannot undo deep chemical penetration.
- Water-based finishes: Water-based varnishes and protective coatings absorb NIR laser energy poorly — energy is reflected or scattered, making cleaning slow, incomplete, or impractical.
- Bulk removal at speed: Laser cleaning is precise, not fast. For large-area rough stripping where throughput is the priority, it is not the right primary tool.
These are not fatal flaws — they are the edges of the operating envelope. The technology excels on surface-applied coatings that absorb laser energy well; it cannot reverse deep chemical penetration, and it is not designed to compete with bulk stripping methods on throughput.
One practical reality that catches operators off-guard is residue management. Ablated material does not disappear — it is converted to fine particulate and fume at the work point, and that material has to go somewhere.
A HEPA-rated extraction system running continuously at the work point is a requirement, not an optional accessory. Multiple specialist sources confirm this: HEPA filtration is the appropriate standard for capturing the respirable fraction of laser-generated airborne contaminants, which are too fine for basic dust collectors to handle. Secondary redeposition — a fine film of vaporised material settling on surrounding surfaces — is also possible and should be anticipated; it wipes away with a soft brush, but it is worth protecting adjacent areas before starting.
A second common misconception is that a laser-cleaned surface is immediately ready for recoating. It is not, in most cases. Freshly cleaned wood is hygroscopic and grain-open — the surface should be resealed promptly, and for most finishing applications a light preparation pass is still advisable to ensure the new finish bonds correctly. The laser removes what was there; it does not automatically create the surface condition a new finish requires.
Laser cleaning preserves the original wood surface with a fidelity that no abrasive or chemical method can match. But it does not compress the full restoration workflow into a single step: extraction is required during cleaning, and surface preparation before recoating remains part of the process.
For many wood cleaning applications, the job cannot come to a workshop — the work has to go to the piece. Heritage buildings, architectural joinery, large fitted furniture, and historic structural timbers are fixed in place, and that constraint shapes everything about how the cleaning system needs to operate.
This is where air-cooled, portable systems become practically relevant rather than abstractly desirable. A system that needs only a single-phase power connection — no water supply, no chiller, no compressor — can operate in locations where a conventional workshop-bound setup simply cannot reach. Woodrow Scientific's ELASER, designed and built in-house by the only UK-based laser cleaning manufacturer, is built specifically around this constraint: a handheld scanner weighing under 3 kg with up to 50 m of delivery cable reach, running from a standard 110–250 VAC supply, with the main unit on wheels and under 50 kg. For on-site heritage and restoration work, those specifics matter in a way that wattage alone does not.
It is also worth noting that the ELASER-RHZ variant carries Woodrow Scientific's world-first reduced hazard zone technology — a capability with particular relevance for publicly accessible heritage sites and open buildings where sealing off a large exclusion area is impractical or impossible.
On realistic throughput: processing speed varies significantly depending on contaminant type, wood species, power level, and the precision the piece demands. According to specialist restoration sources, a small panel or a single chair seat at conservative parameters can take in the region of 30–60 minutes; a large case piece — a wardrobe, a dining table, a significant architectural element — will require multiple sessions across several hours. This is not a weakness of the technology: it is a direct consequence of the precision it provides, and the incremental, test-as-you-go approach that irreplaceable wood demands.
With a clear picture of what laser cleaning on wood actually delivers — and where its boundaries lie — the remaining question is whether it suits your specific application. That is exactly what the conclusion addresses.
Ready to See Laser Cleaning on Your Application?
You know where laser cleaning excels on wood. Speak with a specialist to discuss your specific surface, coating, and precision requirements, and whether the ELASER is the right fit.
Conclusion
Is laser cleaning right for your wood application?
When substrate preservation is the priority — heritage timber, carved architectural detail, fine furniture, surfaces where every millimetre of original wood matters — laser cleaning is the technically superior choice.
Where it falls short is equally clear: deeply absorbed dye stains, water-based finishes with poor laser absorption, and bulk stripping on rough utility timber where speed outweighs precision are better served by other methods.
For anyone moving toward a purchase, weight your evaluation on pulsed operation, tunable parameters, and portability — those are the capabilities that determine whether a machine can actually handle wood well.
Frequently asked questions about laser cleaning on wood
Practical answers to the questions most commonly asked by those evaluating laser cleaning for wood surfaces — from machine selection and workflow expectations to real-world limitations.
A pulsed fibre laser with fully tunable power, adjustable pulse frequency, and programmable scan parameters is the correct choice for wood cleaning. Pulsed delivery allows the surface to cool between pulses — essential for an organic substrate that cannot dissipate sustained heat. Continuous wave (CW) lasers are not suitable for wood at any practical power level; the uninterrupted energy input builds heat faster than wood can shed it, causing irreversible scorching. Tunability is not a convenience feature here — it is a technical requirement. Wood operates within a narrow window where coating ablation occurs without substrate damage, and that window shifts depending on the coating type, wood species, and surface condition. In practice, "programmable scan parameters" means controlling scan speed, spot size, and pulse frequency together as a system: slowing the scan increases energy per unit area; widening the spot reduces fluence. These variables interact, and a machine that allows independent adjustment of all three gives the operator the control wood demands.
Often yes — light sanding is typically recommended before applying a new finish to laser-cleaned wood. The ablation process can leave micro-texture changes on the surface, and fine particulate from vaporised coating material may redeposit as a thin film. Neither issue is severe, but both can affect how a new finish bonds and sits. The laser cleans the surface; it does not prepare it in the way sanding does. Think of it as two distinct steps: laser cleaning removes the old coating efficiently and without chemical residue, then a light pass with fine-grit paper opens the grain and ensures the new finish adheres correctly. The extent of sanding required is genuinely light — this is not the heavy preparation needed after chemical stripping or aggressive abrasion.
The primary risks are scorching and carbonisation if power or pulse frequency is set too high; raised grain from rapid localised heating; veneer damage on thin or delicate surfaces where excess energy penetrates through the coating; and fume generation from vaporised coating material, which requires active extraction. All of these risks are predictable and manageable with correct technique. Scorching is the only outcome that cannot be reversed, which is why the professional standard is to start at conservative parameters, test on a hidden area or scrap piece, and escalate incrementally. A HEPA-rated extraction system running continuously at the work point is standard practice — not optional. Fumes from ablated paint, varnish, or stain can contain harmful compounds depending on the coating's chemistry, and adequate extraction protects both the operator and the workspace. With proper parameter control and test cleaning, none of these risks should materialise in practice.
Yes — pulsed fibre lasers at correctly calibrated parameters can remove paint, varnish, soot, and surface grime from wood without damaging the substrate beneath. The two conditions that determine success are pulsed (not continuous wave) operation and careful parameter control matched to the specific coating and wood type. Coatings that respond reliably include oil-based paints, solvent-based varnishes, shellac, and soot or fire-char deposits. Water-based finishes absorb near-infrared laser energy less efficiently and can be more difficult to remove cleanly. Deeply penetrating dye stains — those that have chemically bonded with the wood fibre rather than sitting on the surface — are a genuine limitation; the laser removes what is on the surface but cannot fully reverse deep chemical penetration. For heritage restoration, fine furniture, carved detail work, and surface-applied coatings on sound timber, laser cleaning is a well-established and reliable method.
Yes, with an important qualification: surface-applied stains, varnishes, and glazes respond well to laser ablation; deeply absorbed dye stains that have penetrated the wood grain are a genuine limitation. The laser acts on what is present at the surface — it vaporises the coating layer through rapid energy absorption. Substances that have chemically bonded with the wood fibre at depth remain largely unaffected, because the ablation mechanism has no means of reaching them without also removing the wood itself. If you are unsure whether your stain is surface-applied or penetrating, a simple diagnostic helps: rub a small area with a cloth dampened with methylated spirits. If colour transfers to the cloth, the stain sits on or near the surface and is a good candidate for laser removal. If no colour transfers, the stain has likely penetrated the grain and laser cleaning will produce limited results on that component of the discolouration.
It works reliably within its domain — and the hype comes almost entirely from overclaiming that domain. For heritage restoration, fine furniture, carved or profiled surfaces, and the removal of surface-applied coatings, laser cleaning is genuinely superior to chemical stripping and abrasive methods: it preserves the original surface profile, leaves no chemical residue, and removes material selectively without touching the substrate beneath. Those are real, measurable advantages that alternatives cannot match on delicate or irreplaceable wood. Where it underperforms: water-based finishes absorb near-infrared laser energy poorly, making removal inconsistent; deeply penetrating dye stains are not fully reversible; and for bulk coating removal on rough utility timber where speed is the priority, abrasive methods remain faster and more cost-effective. The technology is sound. The scepticism is warranted only when laser cleaning is presented as a universal solution — it is not. Matched to the right application, it is one of the most precise coating-removal methods available for wood surfaces.