

Introduction
A weld joint can be visually perfect — clean bead, full fusion, no surface defects — and still carry a hidden vulnerability that no visual inspection will catch.
This guide is written for welding engineers, fabricators, quality inspectors, and materials engineers who need to understand not just what the heat affected zone is, but why it deserves as much attention as the weld metal itself.
The sections ahead move from foundational understanding through formation mechanics, subzone structure, and property effects, arriving at the process choices and engineering controls that determine how large and how damaging the HAZ becomes.
TL;DR
The heat affected zone is where weld quality is genuinely won or lost — yet it is the region most invisible to standard inspection. Engineers who understand its formation, its internal structure, and its effect on material behaviour are the ones who prevent failures rather than investigate them.
This article covers:

What the HAZ is and why it forms
How thermal cycles drive HAZ microstructure
The four subzones and their differences
HAZ effects on hardness and toughness
Why sound welds still fail in the HAZ
Process and parameter controls that reduce HAZ
What Are Heat Affected Zones?
A weld can pass visual inspection, meet dimensional tolerances, and still harbour a zone of structurally compromised material that no surface examination will reveal. That zone is the heat affected zone — and understanding it is fundamental to understanding weld integrity.
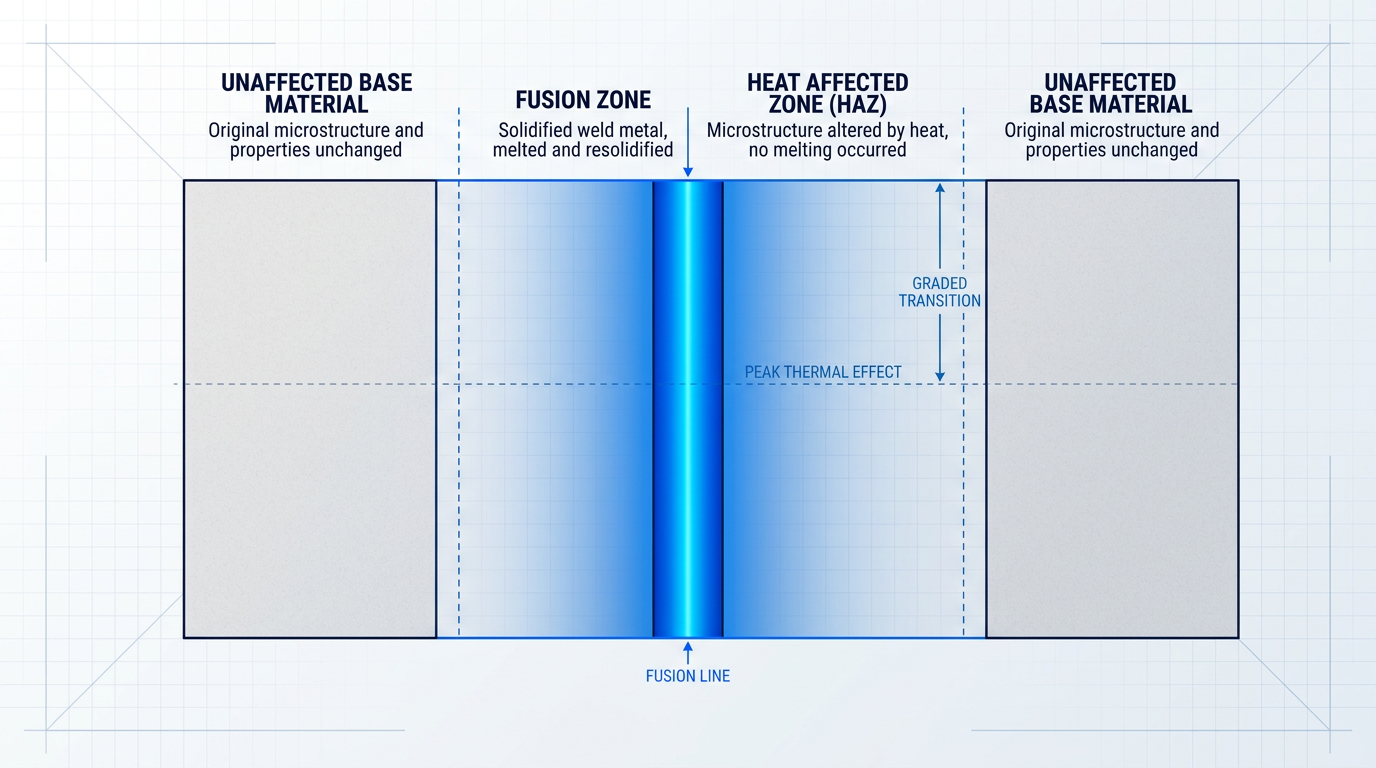
The heat affected zone (HAZ) is the area of base material adjacent to a weld or cut that has not melted but has undergone changes in microstructure and mechanical properties as a result of exposure to high temperatures.
Both conditions in that definition matter equally: the HAZ has not melted — which distinguishes it from the fusion zone — and it has changed, which distinguishes it from the unaffected parent material beyond it.
Spatially, the HAZ occupies the transitional band between these two regions: it begins at the fusion line, where solidified weld metal meets base material, and extends outward until the temperature experienced during welding or cutting was too low to alter the material's microstructure.
It is not a sharp boundary on either side. The HAZ grades continuously — most severely affected near the fusion line, progressively less so toward the outer edge, where it merges imperceptibly with the original parent material.
The HAZ exists as a distinct region because the thermal history it experiences is fundamentally unlike either of its neighbours.
Base materials arrive at the fabrication stage with a carefully engineered microstructure, established through controlled rolling, heat treatment, or other manufacturing processes designed to achieve specific mechanical properties.
The intense, localised heat of welding or cutting imposes a completely different thermal cycle on the adjacent material — peak temperatures high enough to alter grain structure and phase composition, followed by rapid cooling — without ever reaching the melting point.
The HAZ is a third, distinct region with its own thermal history. It is not slightly damaged weld metal, and it is not slightly heated base material — it is base material whose original engineered microstructure has been permanently disrupted without melting.
The size and severity of the HAZ are not fixed quantities — they vary considerably depending on the material's thermal properties, the concentration of the heat source, and the welding or cutting process used.
A material that conducts heat rapidly will spread the thermal energy over a wider area, producing a broader HAZ; a highly focused heat source will confine it more tightly. These relationships — and the specific factors that govern them — are explored in detail later in this guide.
What those microstructural changes produce, in most cases, is a degradation in material performance: the affected region may become harder or softer than the parent material, more brittle, more susceptible to cracking, or less resistant to corrosion, depending on the alloy and the thermal cycle it experienced.
Critically, the HAZ is also a well-documented failure initiation site — the location where weld failures begin, often in joints that show no outward sign of defect. Understanding why requires first understanding how the HAZ forms, which is where the next section begins.
How the HAZ Forms: Thermal Cycles and Heat Gradients
In the fraction of a second that a welding arc or cutting beam passes over base material, the metal millimetres away from the weld experiences a thermal event that bears no resemblance to anything in its prior manufacturing history — temperatures surge from ambient to hundreds or even thousands of degrees, then plummet again, all within seconds.
This is the thermal cycle: a rapid rise to a peak temperature, followed by rapid cooling back toward ambient. The parent metal was originally processed — rolled, heat-treated, quenched, tempered — through carefully controlled thermal sequences designed to produce a specific microstructure. The HAZ thermal cycle is the opposite of that: it is violent, uncontrolled, and compresses into seconds what the original processing spread over hours.
That asymmetry is the root cause of every microstructural change the HAZ undergoes. The material has no time to equilibrate, no controlled cooling rate, and no opportunity to develop the phases its original specification intended.
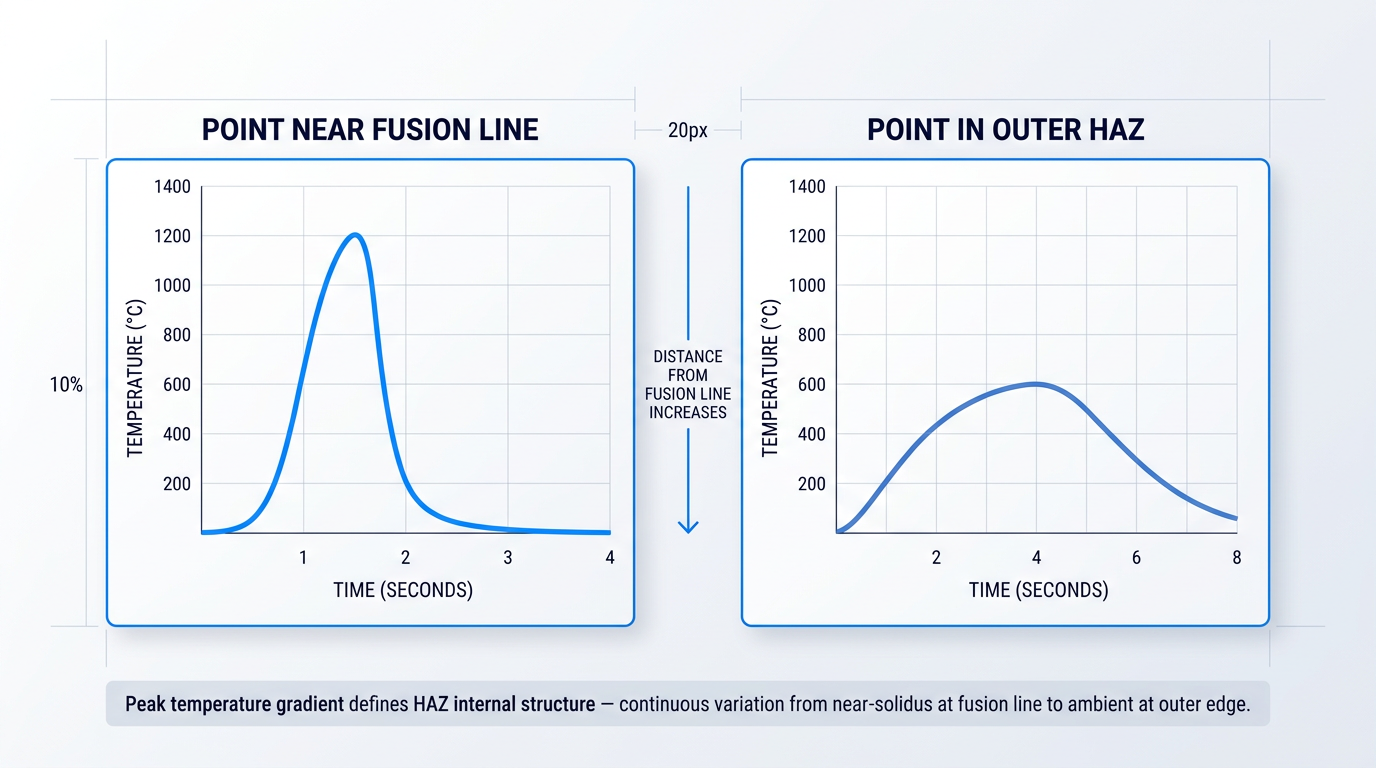
As the curves above illustrate, the peak temperature gradient is the defining physical feature of the HAZ: the closer a point sits to the fusion line, the higher the peak temperature it reaches and the steeper its heating and cooling rates.
This gradient is continuous, not a series of abrupt steps — peak temperature decreases smoothly with increasing distance from the fusion line, and it is this smooth variation that produces the HAZ's layered internal structure, where each band of material has been exposed to a characteristic range of thermal conditions.
Crucially, the HAZ does not melt. At the fusion line itself, temperatures exceed the liquidus and the material transitions to liquid — that is the fusion zone. Moving outward, temperatures fall below the solidus, and the material remains entirely solid throughout the thermal cycle.
Remaining solid does not mean remaining unchanged. Temperatures in the HAZ are still high enough to drive significant solid-state transformations — grain growth, phase changes, precipitate dissolution, and recrystallisation — without any melting or change in chemical composition. This is precisely why HAZ damage is microstructural rather than compositional, and why it leaves no visible trace at the surface.
What Drives HAZ Size?
Thermal diffusivity is the material-side property that governs how quickly heat spreads through the base material and how rapidly the affected volume cools. It is fixed once the material is chosen, which means it explains why identical welding parameters produce very different HAZ widths in different materials.
Aluminium has high thermal diffusivity: it conducts heat away from the weld quickly, which both distributes heat over a larger volume and accelerates cooling — the net result is that the HAZ, while spread broadly, cools fast enough to limit the duration of high-temperature exposure. Austenitic stainless steel, by contrast, has low thermal diffusivity: heat lingers in the vicinity of the weld for longer, sustaining elevated temperatures over a wider zone and producing a broader, more severely affected HAZ for the same heat input.
Where material choice sets the baseline, process variables determine how much energy is deposited and how concentrated it is — and these are the levers available to the engineer. Three are fundamental.
- Heat input: Higher energy per unit length of weld means more heat deposited into the base material, a slower subsequent cooling rate, and a wider HAZ.
- Travel speed: Faster travel reduces the time the heat source dwells over any point, lowering peak temperatures reached and accelerating the cooling cycle — both effects narrow the HAZ.
- Heat source concentration: A tightly focused, high-energy-density source limits the volume of material that reaches damaging temperatures; a diffuse source spreads energy widely, enlarging the HAZ.
These three levers interact: a high heat input combined with slow travel speed and a diffuse source produces the widest, most severe HAZ; a concentrated source at high speed with controlled energy input produces the narrowest. The quantitative relationships and their practical implications will be examined in detail in the influencing factors and mitigation sections later in this guide.
Every point within the HAZ experienced a unique combination of peak temperature, heating rate, and cooling rate determined by its distance from the fusion line. The parent material's specification accounted for none of it.
A quenched-and-tempered steel owes its toughness and strength to a specific, engineered thermal history. The HAZ thermal cycle partially or fully erases that history in the affected zone, replacing it with whatever microstructure the rapid, uncontrolled heating and cooling produces — which may differ substantially from what the engineer specified when selecting the parent material.
That continuous peak temperature gradient — from near-solidus at the fusion line boundary down to ambient at the outer edge of the HAZ — is what divides the zone into metallurgically distinct bands. The next section maps those bands in detail, identifying what each one experienced and what that means for the material's properties.
Regions of the Heat Affected Zone: Four Subzones
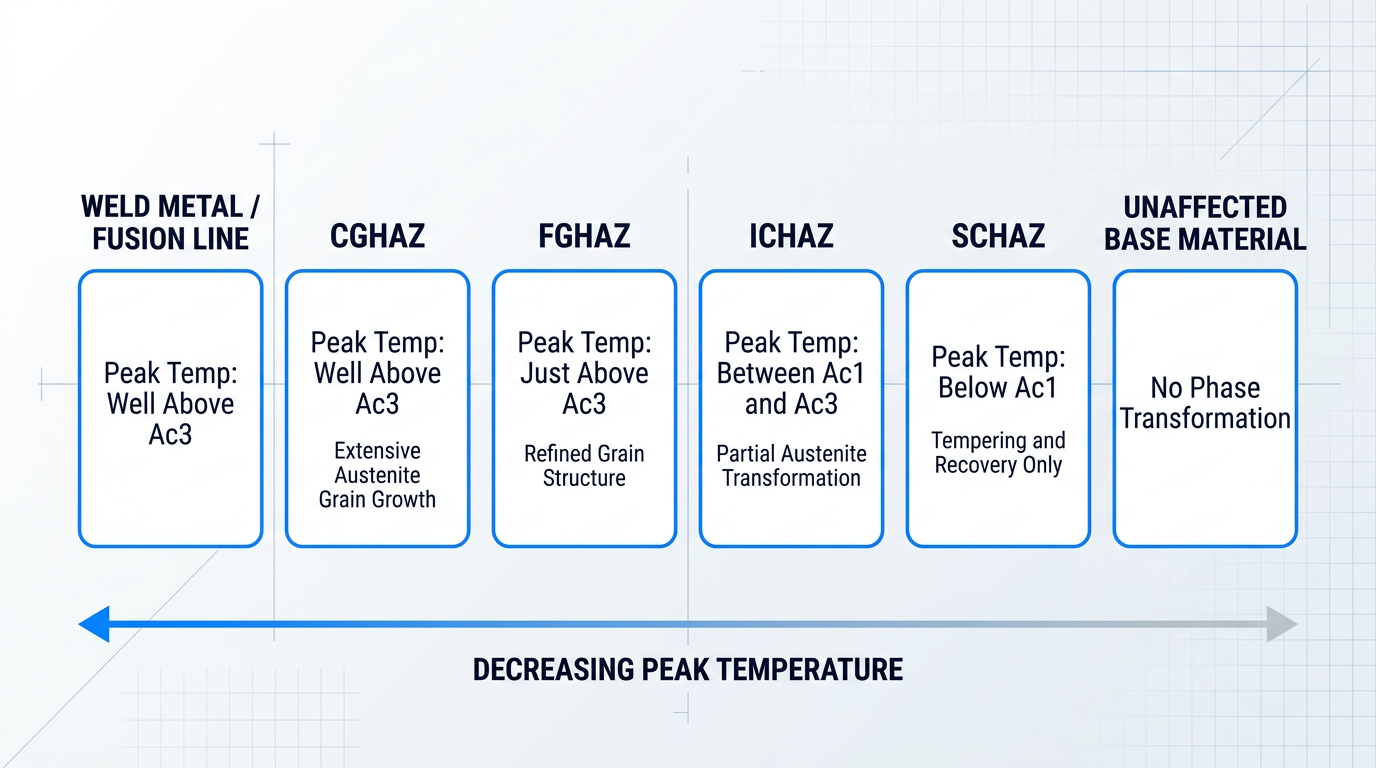
The thermal gradient established across the heat affected zone is not just a temperature map — it is a microstructure map. Each position in the HAZ experienced a unique peak temperature during the thermal cycle, and that peak temperature determined exactly what happened to the metal's grain structure and phase composition at that location. Two critical transformation temperatures govern where the boundaries fall: Ac1, the temperature at which austenite begins to form on heating, and Ac3, the temperature at which transformation to austenite is complete. These two thresholds divide the HAZ into four metallurgically distinct subzones.
Moving outward from the fusion line, peak temperature decreases steadily, and with it the degree of microstructural disruption — from full austenitisation with extensive grain growth, through full austenitisation with limited grain growth, through partial transformation, to sub-transformation-temperature changes that alter the material without producing a phase change at all.
Coarse-Grained HAZ (CGHAZ)
The CGHAZ is the subzone immediately adjacent to the fusion line, where peak temperatures climb well above Ac3 — the material fully transforms to austenite and is held at very high sub-melting temperatures for a significant portion of the thermal cycle.
At these extreme temperatures, the mechanisms that normally constrain grain size — carbide precipitates, solute drag, and the grain boundary pinning effects of prior processing — dissolve or become ineffective, freeing austenite grains to grow rapidly and without restraint.
The result of this unconstrained austenite grain growth is a coarse-grained microstructure with grains substantially larger than those in the original base material — making the CGHAZ the most metallurgically disrupted subzone in the entire HAZ.
Fine-Grained HAZ (FGHAZ)
Outward from the CGHAZ lies the FGHAZ, where peak temperature sits just above Ac3: high enough to complete the transformation to austenite, but not high enough to sustain the grain growth seen in the adjacent subzone.
Because full austenitisation occurs, the prior microstructure is effectively normalised — yet the relatively modest peak temperature keeps grain growth in check, producing a refined grain structure that is generally regarded as the most mechanically favourable subzone within the HAZ.
Intercritical HAZ (ICHAZ)
Further outward, the ICHAZ occupies the temperature range between Ac1 and Ac3 — the intercritical region where only partial transformation to austenite occurs, leaving the microstructure at peak temperature as a mixture of austenite and untransformed ferrite or other pre-existing phases.
On cooling, the austenite regions transform into new phases while the untransformed areas retain their original character, producing a heterogeneous mixed microstructure whose properties are complex and highly dependent on the specific alloy composition.
Subcritical HAZ (SCHAZ)
The outermost subzone is the SCHAZ, where peak temperature remains below Ac1 — the material never enters the austenite phase field, and no phase transformation takes place.
This does not mean the material is unaffected: subcritical temperatures are sufficient to drive tempering of existing microstructural features, recovery of dislocation structures, and redistribution of precipitates — changes that distinguish the SCHAZ clearly from the unaffected base material beyond it, even in the absence of any phase change.
The four HAZ subzones are not arbitrary classifications — they are the direct physical expression of the Ac1 and Ac3 transformation boundaries mapped onto the peak temperature gradient. Every position in the HAZ carries a microstructural record of exactly what temperature it reached, and nothing more.
It is worth noting that this four-subzone model applies specifically to steels that undergo the ferrite-to-austenite transformation on heating. In non-transforming materials such as aluminium alloys and austenitic stainless steels, there is no equivalent phase transformation to use as a boundary marker, so the HAZ is instead characterised in terms of grain growth and recrystallisation zones.
Multi-pass welding introduces a further complication: each subsequent weld pass reheats the HAZ regions created by earlier passes, and a region originally solidified as CGHAZ can be reheated to intercritical temperatures by a later pass, producing the ICCGHAZ (Intercritically Reheated Coarse-Grained HAZ) — a subzone combining prior coarse grain structure with the heterogeneous transformation characteristics of the intercritical range, and a recognised concern in multi-pass structural welding.
With the subzone architecture of the HAZ now mapped, the logical next question is what these microstructural differences actually mean in service — how the distinct grain structures and phase compositions of the CGHAZ, FGHAZ, ICHAZ, and SCHAZ translate into measurable changes in hardness, toughness, ductility, and corrosion resistance.
How the HAZ Affects Mechanical and Material Properties
Knowing the subzone structure of a heat affected zone is only half the picture. The more consequential question is what that structure means for the material's actual behaviour in service — its ability to resist cracking, carry load, withstand corrosion, and absorb energy. The HAZ is not a band of uniformly degraded material: it is a complex, position-dependent property profile, and the changes it undergoes are not always in the same direction.
Hardness: Hardening and Softening in the Same Zone
In hardenable steels, the CGHAZ is the subzone most susceptible to forming untempered martensite when cooling rates are fast enough to suppress the diffusion-controlled transformations that produce softer microstructures.
Martensite is significantly harder and more brittle than the parent material's controlled microstructure — its presence in the CGHAZ represents a sharp departure from the mechanical properties the steel was designed to exhibit.
The hardness change in the HAZ is not always upward, however. In thermomechanically controlled process (TMCP) steels, the thermal cycle can over-temper the microstructure, reducing strength below the base metal level and creating what is documented as a softened HAZ — a structural concern because it can become the weakest cross-section in the joint.
In aluminium alloys, the same thermal cycle dissolves the strengthening precipitates responsible for the alloy's mechanical properties, producing a softened band that persists after the weld has cooled.
The direction of hardness change is therefore material- and process-dependent. Engineers cannot assume the HAZ will be uniformly harder or uniformly weaker than the parent material — the outcome depends on the alloy system, its thermal history, and the cooling rate imposed by the welding process.
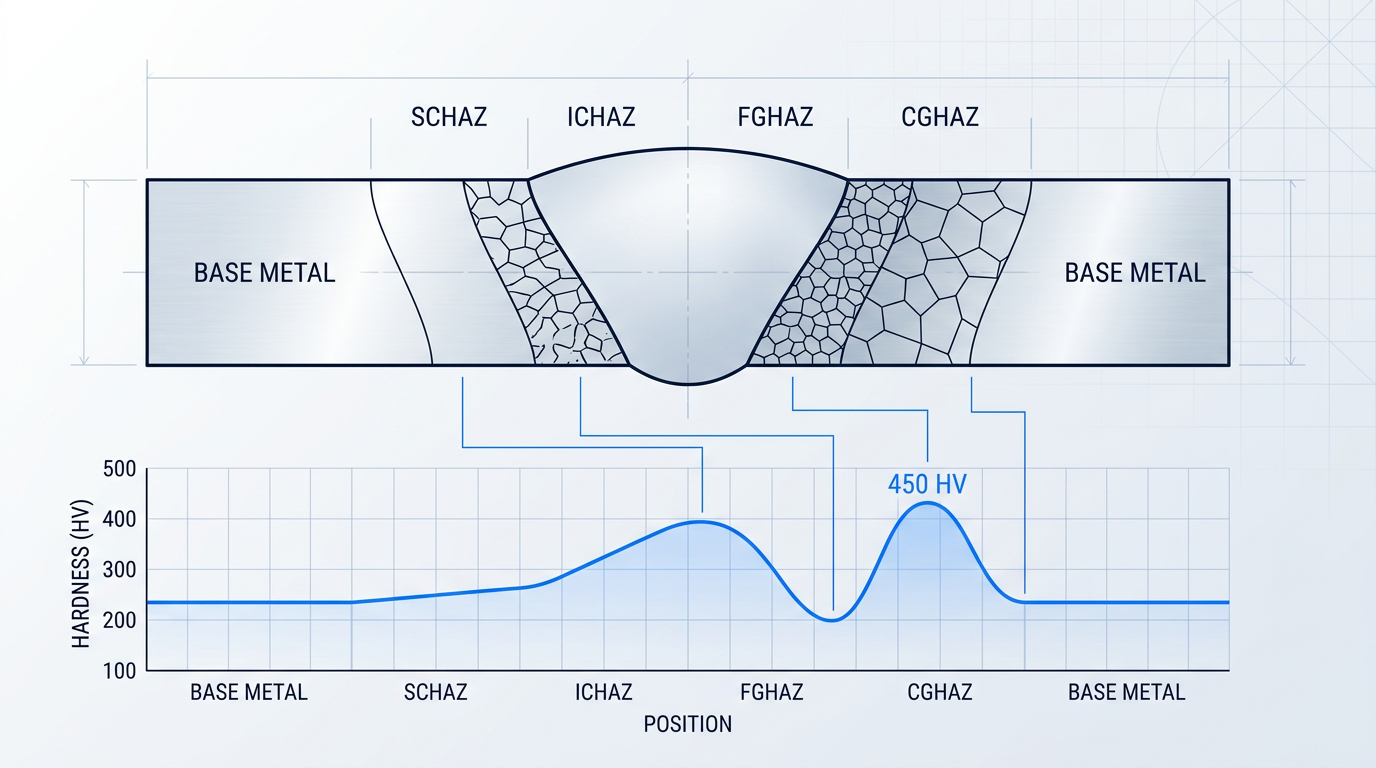
Toughness Variation Across the HAZ
Toughness — the material's capacity to absorb energy before fracture — follows a similarly non-uniform pattern across the HAZ, and the CGHAZ is again the zone of greatest concern.
The coarse prior-austenite grain structure of the CGHAZ reduces toughness directly, and if brittle microstructures such as untempered martensite or upper bainite are present, the reduction is compounded further.
By contrast, the FGHAZ is generally the most metallurgically favourable subzone: the refined grain structure produced by reheating into the upper austenitic range improves toughness relative to the CGHAZ, and in many steels the FGHAZ approaches or matches base metal toughness levels.
In multi-pass welds, a particularly problematic region can develop: the intercritically reheated coarse-grained HAZ (ICCGHAZ), where the CGHAZ of an earlier pass is reheated into the intercritical temperature range by a subsequent pass. This reheating can produce a localised region of mixed microstructure with severely reduced toughness — and it is well documented in structural steels as one of the most toughness-critical locations in a welded joint.
Toughness across the HAZ is best understood as a position-dependent profile, not a single material property. A fracture toughness test sampled from the FGHAZ will return a very different result from one sampled from the CGHAZ or the ICCGHAZ of the same weld.
Rapid cooling from the high peak temperatures reached in the CGHAZ also affects ductility. In high-carbon and low-alloy steels, the cooling rate achievable in typical welding conditions is sufficient to form martensite, which has significantly reduced ductility compared to the ferritic or tempered microstructures it replaces — making the CGHAZ the location where ductility reduction is most severe.
Sensitisation and Corrosion Resistance in Stainless Steels
In austenitic stainless steels, the HAZ introduces a failure mode that is entirely distinct from mechanical property degradation. When the steel is exposed to the sensitisation temperature range of approximately 450–850°C — which corresponds to portions of the HAZ — chromium carbides precipitate at grain boundaries.
This precipitation depletes the chromium content in the metal immediately adjacent to those boundaries, creating chromium-depleted zones that fall below the threshold needed to maintain passive corrosion resistance. The result is a HAZ that may be mechanically intact but is preferentially attacked in corrosive service environments — a phenomenon known as weld decay.
Weld decay is not visible to the eye and is not revealed by hardness testing alone. A weld that passes every standard mechanical inspection can still harbour a sensitised HAZ that will corrode preferentially from the inside out once placed in service.
In austenitic stainless steels, a HAZ can be mechanically sound and pass visual and hardness inspection, yet be critically compromised in corrosive service due to chromium depletion at grain boundaries. No surface examination will reveal it.
The non-uniform thermal expansion and contraction of the weld thermal cycle generates a further consequence: residual stresses locked into the component before any service load is applied. As the weld metal and HAZ cool and contract, the surrounding cooler base material constrains this movement, driving residual tensile stresses into and around the HAZ that add directly to whatever applied loads the joint will carry in service.
The combined picture across material classes illustrates that HAZ property behaviour is not universal. In carbon and low-alloy steels, the dominant concerns are martensite-driven hardening and toughness reduction in the CGHAZ. In austenitic stainless steels, sensitisation and the associated loss of corrosion resistance is the characteristic HAZ risk. In precipitation-hardened aluminium alloys — particularly the 6xxx and 7xxx series — precipitate dissolution and the resulting softened HAZ band are the primary structural concern.
These property changes — hardness gradients, toughness reduction, ductility loss, sensitisation, and residual tensile stress — are not theoretical abstractions. They are measurable, spatially variable conditions present in every welded joint, and they are the foundation for understanding why welds can fail in the HAZ even when the weld itself looks structurally sound.
Why Welds Fail in the HAZ: the Hidden Risk
A completed weld can show full fusion, a clean bead profile, no surface cracking, and still contain a structurally compromised zone that no visual examination will ever reveal.
Visual inspection assesses the fusion zone — the weld metal itself. It tells you nothing about the microstructural condition of the heat affected zone immediately adjacent to it. This is the gap that causes HAZ-initiated failures to arrive without warning.
Residual stress is the first mechanism that loads the HAZ before any service force is ever applied. Non-uniform thermal expansion and contraction during welding locks tensile stresses into the HAZ at the point the weld cools, effectively pre-stressing the material.
Those locked-in stresses add directly to applied service loads. Crack initiation can therefore occur at nominal stress levels that would be entirely safe in the unaffected base material — because the HAZ is already carrying a hidden load from the welding process itself.
The situation compounds further at weld toes and weld roots, where geometric stress concentration, degraded HAZ microstructure, and residual tensile stress all converge at the same physical location — making these the preferred sites for crack initiation across multiple failure modes.
HAZ Failure Mechanisms
Four distinct failure pathways originate in the HAZ, each exploiting the microstructural and stress-state conditions the welding thermal cycle creates.
- Brittle fracture (CGHAZ martensite): Untempered martensite in the CGHAZ offers low resistance to crack propagation. Once a crack initiates at a stress concentration, it can advance rapidly through the brittle zone.
- Hydrogen-assisted cold cracking: Hydrogen absorbed during welding diffuses to hard, stressed CGHAZ regions in carbon-manganese steels and can trigger cracking hours or days after the weld has cooled and been visually cleared.
- Stress corrosion cracking: In austenitic stainless steels, sensitised HAZ regions combine with residual tensile stress and a corrosive environment to drive cracking at stresses safe in the unsensitised base material.
- Fatigue crack initiation: At weld toes and roots, geometric stress concentration, degraded CGHAZ microstructure, and residual stress act together, making the HAZ a well-documented fatigue crack initiation site under cyclic loading.
What links all four mechanisms is the same underlying reality: they exploit conditions — compromised microstructure, elevated residual stress, geometric stress concentration — that are entirely invisible to surface examination.
Hydrogen-assisted cracking can occur hours or even days after welding completes. A weld that passes visual inspection immediately after fabrication may still crack during further processing or early in service — by which point it has already moved through quality assurance.
The stress corrosion cracking pathway deserves particular attention in stainless steel fabrication: sensitisation alone does not cause failure, but when it coincides with residual tensile stress and a chloride or acidic service environment, the HAZ becomes the weakest link in an otherwise corrosion-resistant structure.
For fatigue, research into CGHAZ behaviour under cyclic loading confirms that the coarse-grained subzone is disproportionately susceptible to fatigue crack initiation relative to the base material — a consequence of both its altered microstructure and its position at the geometric stress concentration of the weld toe.
Taken together, these failure modes make a clear case for why HAZ condition cannot be assessed by visual inspection alone.
What Adequate HAZ Assessment Actually Requires
Hardness testing across the HAZ identifies over-hard microstructures that indicate susceptibility to hydrogen-assisted cracking and brittle fracture — something a surface examination cannot detect.
NDE methods sensitive to subsurface cracking — ultrasonic testing, magnetic particle inspection, and phased array ultrasonic testing — are the appropriate tools for detecting cracks that have already initiated within the HAZ.
Welding procedure qualification, which verifies that a given set of process parameters produces an acceptable HAZ microstructure for the intended application and service environment, is the upstream control that reduces the probability of all four failure modes reaching the inspection stage.
The engineer or inspector who understands HAZ failure mechanisms knows not just what to look for, but how to look for it — and that distinction is precisely what separates proactive quality assurance from post-incident investigation.
With the failure implications now established, the logical next question is what determines how large and how severe the HAZ becomes in the first place — which is what the following section addresses.
Factors That Influence HAZ Size and Severity
The size and severity of a heat affected zone are not fixed outcomes of the welding or cutting process — they are the product of identifiable, interacting variables that engineers can measure, predict, and in most cases control. Knowing what those variables are, and how each one drives the HAZ in a particular direction, is what separates reactive troubleshooting from deliberate process design.
Heat input is the single most important process-side variable governing HAZ size, and it provides the quantitative backbone for thinking about HAZ control. It is defined as the energy deposited per unit length of weld — the higher the heat input, the more energy is transferred into the base material per millimetre of travel.
The relationship is expressed in the heat input formula: heat input = (voltage × current) / travel speed × efficiency factor. Voltage and current together set the arc energy; travel speed determines how long the base material is exposed to that energy at any given point; and the efficiency factor accounts for the fraction of arc energy actually transferred into the workpiece, which varies by process.
The causal chain that follows from higher heat input is straightforward: more energy deposited per unit length raises a greater volume of base material above critical transformation temperatures, and the slower cooling rate that results gives more time for grain growth and phase transformations to occur — producing a wider, more structurally altered HAZ.
Travel speed: the most adjustable shop-floor lever
Travel speed is already embedded in the heat input formula as the denominator, but it deserves separate attention because it is the variable most immediately adjustable by the welder or operator — without changing equipment settings, consumables, or process parameters.
Increasing travel speed reduces the energy deposited per unit length, shortens the time the base material dwells at elevated temperature, and narrows the HAZ. Slowing down does the opposite: dwell time increases, more energy is deposited per unit length, and the HAZ widens accordingly. When a fabricator wants to reduce HAZ width on the shop floor, travel speed is typically the first lever they reach for.
Thermal diffusivity: the material-side constraint
Thermal diffusivity is a material property that determines how rapidly heat conducts away from the weld zone into the surrounding base material. It is not a process lever — it is a constraint the engineer must account for when selecting parameters, because it is inherent to the material being welded.
The contrast between aluminium and austenitic stainless steel illustrates this clearly. Aluminium has high thermal diffusivity: heat dissipates quickly into the surrounding material, the HAZ cools rapidly, and it tends to stay narrow despite the relatively high heat input often required to fuse the material. Austenitic stainless steel has low thermal diffusivity: heat is retained in the weld region, the HAZ cools slowly, and it tends to be wider — even at moderate heat inputs.
Carbon equivalent: predicting HAZ hardenability
Carbon equivalent (CE) is a single-number metric derived from a steel's chemical composition that predicts its hardenability — its tendency to form hard, brittle microstructures, particularly martensite, in the HAZ when cooled at a given rate. It is the first number a welding engineer looks at when assessing a new steel grade's weldability and HAZ risk.
Two CE formulae are in common use: the IIW formula (CE = C + Mn/6 + (Cr+Mo+V)/5 + (Ni+Cu)/15), suited to conventional structural steels, and the Pcm formula, better suited to lower-carbon microalloyed steels. The arithmetic matters less than the concept: a higher CE means greater hardenability, which means more severe HAZ microstructure at any given cooling rate — and therefore a stronger demand for careful process control.
Preheat temperature and its role in HAZ formation
Raising the preheat temperature before welding is a direct intervention in the thermal cycle. By elevating the starting temperature of the base material, the engineer deliberately slows the cooling rate of the HAZ after the arc passes — extending the t8/5 cooling time (the time taken to cool from 800°C to 500°C) and reducing the tendency to form martensite.
Preheat also promotes the diffusion of hydrogen out of the joint region before it can accumulate to levels that cause cold cracking. The preheat level required for a given joint is driven primarily by the steel's CE and by section thickness — both a higher CE and a thicker section demand a higher preheat to achieve an acceptable HAZ microstructure.
Carbon equivalent translates a steel's composition into a direct preheat requirement. A high-CE steel is not an unmanageable material — it is a material that demands a higher preheat to achieve the same HAZ outcome as a low-CE steel. CE is therefore not just a material property; it is a process planning input.
In multi-pass welding, the concept extends further through interpass temperature — the temperature of the previously deposited weld and its HAZ at the point when the next pass is laid. This variable imposes a two-sided constraint: if interpass temperature is too low, hydrogen may not have had sufficient time to diffuse out before the next pass is deposited, increasing cold cracking risk; if it is too high, the cumulative thermal history can over-temper thermomechanically controlled processed (TMCP) steels or quench-and-tempered steels, degrading their strength.
This two-sided constraint distinguishes interpass temperature from preheat, which carries a minimum threshold but no equivalent upper-bound risk for most common structural steels. In high-strength or heat-treated steel applications, managing the interpass ceiling is as critical as maintaining the preheat floor.
- Section thickness as heat sink: Thicker sections draw heat away from the weld zone faster, accelerating cooling and increasing HAZ hardness. Counter-intuitively, thicker material produces a harder, more severe HAZ — not a softer one.
- Joint geometry and heat flow paths: A T-joint allows heat to escape in three directions, cooling the HAZ faster than a butt joint's two-dimensional heat flow — influencing both cooling rate and resulting microstructure.
With these variables mapped out — heat input, travel speed, thermal diffusivity, carbon equivalent, preheat, interpass temperature, and section geometry — the natural next question is how different welding and cutting processes sit on these axes. Process selection is itself a HAZ control decision, and that is what the next section examines.
HAZ by Process: From Oxyfuel to Laser
Two engineers can weld the same joint in the same steel and end up with heat affected zones that differ by an order of magnitude — not because of material or operator skill, but because of process choice. Energy density and heat source concentration are the governing variables: the more tightly the heat source focuses its energy, and the faster it traverses the joint, the less time surrounding metal has to absorb heat and the narrower the HAZ.
Across the full spectrum of thermal joining and cutting processes, this principle plays out consistently — from oxyacetylene cutting at one extreme, where a wide, slow-moving flame saturates the surrounding material with heat, to laser welding and laser cutting at the other, where a focused beam moves at speeds that leave the adjacent metal barely touched.
The HAZ Spectrum: Process by Process
Oxyacetylene cutting sits at the wide end of the HAZ spectrum. The combination of intense heat, a broad flame, and inherently slow travel speeds means the surrounding base material is exposed to elevated temperatures for a prolonged period — the worst possible combination for HAZ control. For precision fabrication, oxyfuel has been largely superseded for exactly this reason; it remains useful for heavy structural work and field cutting where HAZ severity is a secondary concern.
Arc welding processes — SMAW, GMAW (MIG), GTAW (TIG), and SAW — occupy the mid-range. Arc energy spreads over a broader area than a laser beam, and the HAZ width reflects this. Within the family, there is meaningful variation: GTAW typically operates at lower heat input than SAW, with its more concentrated arc producing a narrower HAZ on thin and heat-sensitive materials. SAW, by contrast, runs at high currents and deposits large volumes of weld metal, which drives heat input up and HAZ width with it. GMAW spans a wide range depending on parameters — short-circuit transfer at low wire feed rates can approach GTAW in terms of heat input, while spray transfer at high amperages behaves more like SAW. The thermal efficiency values also differ across the arc family: GMAW and SAW carry a factor of 0.9, GTAW 0.8, and SMAW 0.75 — meaning more or less of the arc energy actually enters the workpiece. Travel speed and parameter discipline are the primary levers within this group.
Plasma cutting sits between arc welding and laser on the HAZ spectrum. The plasma arc is wider than a laser beam but considerably narrower than an oxyfuel flame, and higher cutting currents enable faster travel speeds that reduce the duration of heat exposure. Critically, an oxyfuel cut will produce a HAZ that is five to ten times larger than a plasma cut on the same material — a difference large enough to be consequential for downstream welding and assembly. Plasma represents a meaningful improvement over oxyfuel for precision cutting applications, though it does not approach the HAZ control achievable with laser.
Laser welding and laser cutting deliver the narrowest HAZ of any thermal process. A laser beam focused to a spot diameter below 0.5 mm achieves power densities in the range of 10⁶ to 10⁷ W/cm² — concentrating energy into such a small area that the surrounding metal has almost no time to absorb heat before the beam has moved on. TWI confirms that both CO₂ and Nd:YAG laser cutting processes produce a HAZ of less than 0.5 mm, a figure that reflects the physics of the focused heat source rather than optimised process conditions.
When comparing laser welding directly against TIG and MIG for the same joint, the difference is substantial. On 18-gauge carbon steel, laser welding introduces roughly 50% of the total heat that TIG or MIG would put into the same part. The focused spot limits how much surrounding metal heats up, distortion is minimised alongside HAZ width, and weld speeds can be three to five times faster than GTAW — meaning the workpiece spends far less total time under thermal load. For stainless steel and aluminium assemblies where flatness, corrosion resistance, and surface appearance are critical, this heat profile is a genuine engineering advantage.
| Process | HAZ Width (typical) | Energy Density | Typical HAZ Characteristic | Best Suited For |
|---|---|---|---|---|
| Oxyacetylene / Oxyfuel Cutting | Widest — several mm or more | Low — wide flame, slow travel | Severe grain growth, extensive softening or hardening across a broad zone | Heavy structural field cutting where HAZ is a secondary concern |
| SAW (Submerged Arc Welding) | Wide — high heat input process | Moderate — high current, large deposit | Significant HAZ width; toughness management requires careful heat input control | Thick-section structural and pressure vessel fabrication |
| SMAW (Stick Welding) | Moderate — mid-range heat input | Moderate — arc spreads over weld area | Thermal efficiency 0.75; HAZ width varies with electrode size and travel speed | General fabrication, maintenance, field welding |
| GMAW / MIG Welding | Moderate — parameter-dependent | Moderate — thermal efficiency 0.9 | Wide parameter range; short-circuit transfer approaches TIG; spray transfer widens HAZ | Production fabrication across a broad range of material thicknesses |
| GTAW / TIG Welding | Moderate-narrow — lower heat input | Moderate — thermal efficiency 0.8, concentrated arc | Narrower HAZ than SAW or SMAW; approximately 3 mm from fusion line in typical carbon/stainless steel | Thin materials, stainless steel, heat-sensitive alloys, precision work |
| Plasma Cutting | Intermediate — significantly less than oxyfuel | Higher than oxyfuel — narrower arc, faster travel | HAZ 5–10x smaller than oxyfuel cut; faster cutting speeds reduce exposure time | Precision plate cutting where oxyfuel HAZ is unacceptable but laser is not required |
| Laser Cutting | Narrowest thermal — sub-0.5 mm achievable | Very high — focused spot below 0.5 mm diameter | Minimal microstructural change; concentrated heat source limits diffusion into base material | Precision cutting of sheet and plate; heat-sensitive alloys; tight-tolerance components |
| Laser Welding | Narrowest thermal — sub-mm, tightly confined | Very high — 10⁶ to 10⁷ W/cm² at focus | ~50% less heat than TIG/MIG on same joint; minimal distortion; narrow, deep fusion zone | Thin sheet, stainless, aluminium, cosmetic and sanitary components, high-speed production |
| Waterjet Cutting | None | Not applicable — cold process | No thermal cycle; no microstructural change at cut edge | Heat-sensitive materials, aerospace components, materials where any HAZ is unacceptable |
| Mechanical Shearing | None | Not applicable — mechanical process | No HAZ; cut edge may show mechanical deformation but no thermal alteration | Sheet metal blanking and straight-line cuts where thermal effects must be eliminated |
Comparison of welding and cutting processes across HAZ width, energy density, HAZ characteristics, and typical application context — to give engineers a scannable process-selection reference.
The pattern across this table is unambiguous: as energy density increases and heat source concentration tightens, HAZ width falls. The outlier worth noting is GTAW — it carries moderate thermal efficiency and a relatively concentrated arc, yet its HAZ can still reach approximately 3 mm in typical carbon and stainless steel applications because travel speeds are inherently lower than laser. This illustrates that energy density and travel speed work together: a focused heat source moving slowly can still produce a wide HAZ, which is why laser's combination of extreme concentration and high travel speed is so effective.
For engineers selecting processes on applications where HAZ size and severity are critical quality constraints — pressure vessels, aerospace structures, food-grade stainless assemblies, thin-wall tubing — this comparison reframes the decision. Process selection is not only a cost or productivity calculation; it is an upstream quality-engineering choice that determines the metallurgical condition of the material at every joint.
Switching from an arc process to laser welding on the same joint can reduce total heat input by around 50% and HAZ width by an order of magnitude — a gain no amount of post-weld treatment can fully replicate.
It is worth noting that waterjet cutting and mechanical shearing produce no HAZ at all — not a small one, but none. These are cold processes: no thermal cycle occurs, no microstructural change takes place at the cut edge, and the material properties at the boundary are unchanged. This is the conceptual boundary that clarifies what a HAZ actually is: a thermal phenomenon, not a universal consequence of material processing.
The surface condition of the HAZ also deserves attention in a process-selection context. Even on laser-welded joints — where the HAZ is narrow and distortion minimal — weld discolouration and surface oxides form in and around the affected zone, particularly on stainless steel. These oxides affect corrosion performance and can obscure inspection. Woodrow Scientific's ELASER offers a laser-based approach to removing this discolouration and oxide layer from the HAZ without mechanical abrasion or chemical treatment, leaving the base material intact — a practical post-weld surface treatment option that carries no consumable cost and avoids the substrate damage that abrasive methods can introduce.
With the process comparison established, the next consideration is what engineers can actively do to reduce HAZ size and severity — regardless of which process they are working with.
How to Reduce the Heat Affected Zone
Every mitigation strategy for the heat affected zone sits in one of two categories: prevention or correction. Prevention — controlling process parameters, selecting the right material, designing the joint well — is always preferable. Correction via post-weld heat treatment (PWHT) is the fallback when prevention alone is insufficient, not an equivalent alternative.
This hierarchy matters because prevention is cheaper, lower-risk, and produces a metallurgically sounder result: a HAZ that was never allowed to grow severe in the first place requires no remediation, carries no distortion risk from subsequent thermal processing, and leaves the base material's engineered microstructure intact.
Process parameter control: the first-line levers
The most direct lever is heat input management. As established in the influencing factors section, heat input is the product of voltage, current, and process efficiency divided by travel speed — reducing any of the numerator terms, or increasing travel speed, directly narrows the HAZ by limiting the energy deposited per unit weld length.
Travel speed is the most practically accessible of these variables on the shop floor: it requires no new equipment, no material change, and no procedural overhaul — just process discipline to push toward the higher end of the acceptable range while maintaining fusion quality and bead profile.
Travel speed cannot be increased without limit. Excessive speed risks incomplete fusion, undercut, and a poor weld profile — so the target is the upper boundary of the qualified range, not beyond it.
Preheat temperature is a double-edged lever. Applied correctly, preheat slows the cooling rate through the martensitic transformation range, reduces HAZ hardness, and promotes hydrogen escape from the joint — all of which lower the risk of hydrogen-assisted cold cracking in hardenable steels. Preheat requirements are driven by carbon equivalent and section thickness, as established in the variables section.
The risk of over-preheating is real, particularly for TMCP steels and quench-and-tempered grades, where the base material's mechanical properties depend on a carefully controlled manufacturing thermal history. Excessive preheat or interpass temperatures can over-temper the parent material adjacent to the weld, degrading the very properties the steel was designed to deliver.
Interpass temperature control is distinct from preheat — it governs the cumulative thermal history of the joint across multiple passes, not just the condition of the first pass. In multi-pass welding, allowing interpass temperature to climb too high causes successive passes to reheat previously deposited weld and HAZ material into the intercritical temperature range, promoting the formation of the intercritically reheated coarse-grained HAZ (ICCGHAZ) microstructure identified in the subzone section as particularly susceptible to low toughness.
For HSLA and TMCP steels, TWI guidance on HSLA welding notes that maximum interpass temperatures are often specified by the steel manufacturer and should be treated as hard limits, not conservative guidelines.
Process parameter control — heat input, travel speed, preheat, and interpass temperature — is the engineering-sound first line of HAZ management. PWHT corrects what process discipline could not prevent; it does not substitute for it.
Design-stage levers: material selection and joint design
Material selection sets the ceiling on what process optimisation can achieve. Choosing steels with a lower carbon equivalent reduces HAZ hardenability — at a given cooling rate, a lower-CE steel forms less martensite and produces a softer, tougher HAZ with reduced cracking risk.
For austenitic stainless steels, low-carbon grades such as 304L and 316L limit the carbon available for chromium carbide precipitation at grain boundaries, directly reducing the risk of sensitisation. Stabilised grades — 321 (titanium-stabilised) and 347 (niobium-stabilised) — go further by preferentially forming carbides with the stabilising element rather than with chromium, preserving the grain boundary chromium content that provides corrosion resistance.
Joint design is the second design-stage lever. Minimising weld volume reduces the total heat input required to complete the joint, which directly limits HAZ extent. For thick sections, U-groove preparations are preferable to V-groove because they require significantly less filler metal and therefore less cumulative heat deposition to fill.
Accurate fit-up is also a HAZ control measure: poor fit-up forces the welder to over-weld to bridge gaps, increasing heat input beyond what the joint geometry actually requires. Tight dimensional control before welding begins is one of the lowest-cost interventions available.
Post-weld heat treatment: the corrective tool
When process parameter control and design-stage decisions are insufficient to bring HAZ hardness and residual stress within acceptable limits, post-weld heat treatment (PWHT) is the corrective measure of choice. Controlled tempering reduces HAZ hardness by allowing the diffusion-driven decomposition of hard martensitic microstructures, while the sustained elevated temperature relieves the residual stresses locked in by the welding thermal cycle.
PWHT is particularly warranted for thick-section joints in hardenable steels, and is a code requirement for many pressure vessel and structural applications where residual stress control is a fitness-for-service obligation rather than a quality preference.
The costs of PWHT are real: the process adds time and expense, introduces distortion risk, and requires careful temperature control to avoid over-tempering or re-sensitising the material. These are the reasons it belongs at the end of the mitigation hierarchy, not the beginning.
For stainless steels, PWHT requires particular care. In supermartensitic and certain other stainless grades, post-weld heat treatment that is not precisely controlled can worsen intergranular corrosion susceptibility rather than resolve it — the heat treatment window is narrow and material-specific guidance from the steel manufacturer or a qualified metallurgist should be followed.
Process selection: the most upstream lever
Process selection sits above all the levers discussed so far — it is the decision made before parameters are set, before material is ordered, before joint design is finalised. As the process comparison section established, higher-energy-density processes concentrate heat into a smaller volume and move faster, inherently producing a narrower HAZ at equivalent joint quality.
Where HAZ severity is a critical quality constraint, selecting a more energy-concentrated process is a legitimate engineering mitigation decision, not merely a productivity or cost consideration. The process choice sets the physical upper bound on how narrow the HAZ can be made, regardless of how well parameters are subsequently optimised.
With the full mitigation toolkit mapped — from upstream process and design decisions through to corrective heat treatment — the broader picture comes into focus: HAZ behaviour is not an unavoidable consequence of welding but a manageable engineering variable, and the conclusion draws together the key principles for applying that understanding in practice.
Conclusion
Understanding the HAZ is the foundation of weld quality
The heat affected zone is not a welding by-product to be tolerated — it is a metallurgical outcome to be understood, predicted, and managed, and that distinction is what separates engineers who build reliable joints from those who spend time explaining why they failed.
Process optimisation is always the first lever; post-weld heat treatment and material selection follow in that order, each most effective when upstream decisions have already reduced the burden on them.
The conceptual foundation is now in place — relevant welding standards and procedure qualification requirements are the natural next step for anyone ready to apply it.
Frequently asked questions about heat affected zones
Common questions about HAZ location, structure, calculation, and control, answered.
The heat affected zone sits between the fusion zone — the weld metal that melted and re-solidified — and the unaffected parent material beyond it. It is a transitional band that experienced significant heat during welding but never reached melting point. HAZ width is not fixed. A material with high thermal conductivity, like aluminium, spreads heat rapidly and can produce a wider HAZ than steel welded under similar conditions. Process choice matters too: two welds that look identical on the surface can have very different HAZ extents depending on the energy density of the process used.
The four subzones are the Coarse-Grained HAZ (CGHAZ), Fine-Grained HAZ (FGHAZ), Intercritical HAZ (ICHAZ), and Subcritical HAZ (SCHAZ). The CGHAZ forms closest to the fusion line, where peak temperatures approach but do not reach melting point — significant grain growth occurs here, making it the most metallurgically disrupted subzone. The FGHAZ sits just above the Ac3 temperature, where full austenitic transformation occurs but grain growth is limited, producing the most mechanically favourable microstructure in the HAZ. The ICHAZ falls between Ac1 and Ac3, where only partial transformation takes place, resulting in a mixed microstructure. The SCHAZ, furthest from the weld, remains below Ac1 — no phase transformation occurs, but tempering of existing microstructures and changes to precipitate distributions can still alter material properties.
HAZ size is estimated analytically using the Rosenthal equations (or their derivatives), which model heat flow from a moving point source and incorporate heat input, preheat temperature, and the thermal properties of the base material. These equations give a theoretical prediction of the temperature distribution around the weld, from which HAZ boundaries can be approximated. In practice, the t8/5 parameter — the cooling time from 800°C to 500°C — is widely used as a proxy for HAZ microstructure in steels. This temperature range spans the austenite-to-martensite and austenite-to-bainite transformations, so t8/5 directly relates to the hardness and toughness of the resulting microstructure. For physical measurement, HAZ width is most reliably determined metallographically: a cross-section through the weld is polished, chemically etched, and examined under a microscope, where the subzone boundaries become visible as distinct microstructural regions.
Any thermal process that raises base material temperature high enough to alter its microstructure will produce a heat affected zone. This includes all conventional welding and thermal cutting processes: arc, laser, plasma, and oxyfuel. Non-thermal processes — waterjet cutting, mechanical shearing, and machining — do not produce a HAZ because no significant heat is introduced to the base material. Even among thermal processes, HAZ size varies enormously. A laser weld can produce a HAZ measured in fractions of a millimetre, while an oxyfuel cut may generate one several millimetres wide. The process determines both whether a HAZ forms and how large it will be.
No — this is a common misconception. The HAZ is not always weaker than the base material. In hardenable steels, the CGHAZ can develop a martensitic microstructure with hardness significantly above that of the parent metal. That said, hardness and strength are not the same as toughness: a harder HAZ region can be considerably more brittle, with reduced resistance to fracture and impact. In other materials — including TMCP steels and aluminium alloys — the HAZ typically softens. Over-tempering in TMCP steels and precipitate dissolution in aluminium alloys both reduce strength in the HAZ below base material levels. The direction and degree of property change depend on material composition and the specific thermal cycle experienced. Whether the HAZ is harder, softer, tougher, or more brittle than the base metal cannot be assumed — it must be assessed for each material and process combination.
Preheat is applied before and during welding to slow the cooling rate of the HAZ. By reducing the temperature differential between the weld area and the surrounding material, preheat lowers the risk of hard, brittle microstructures forming and gives dissolved hydrogen time to diffuse out of the joint before it can cause cracking. Post-weld heat treatment (PWHT) is applied after welding to temper hard microstructures that have already formed and to relieve residual stresses locked into the joint during cooling. The two treatments address different mechanisms. Preheat is preventive — it shapes the thermal cycle as it happens. PWHT is corrective — it modifies the microstructure after the fact. When a welding procedure specifies both, neither is a substitute for the other. Using PWHT alone does not compensate for skipping preheat, and preheating does not eliminate the need for stress relief where the application demands it.